Essential Question(s):
1. What are the Elements of Art?
2. How can understanding the Elements of Art make me a better artist and my artwork more successful?
3. How can I create value with the shading technique, blending?
4. How do I create form with value and blending?
Mastery Objective(s): The student will…
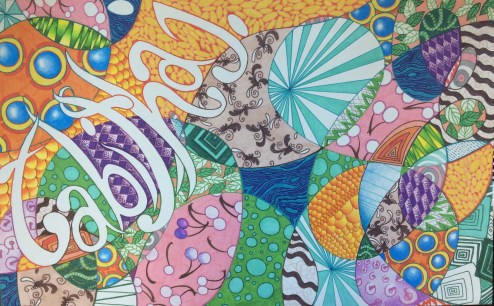
1 .demonstrate their understanding of the Elements of Art by creating a 2-D Design with his/her name that conveys a specific mood or feeling through the chosen style of the lettering, colors, and patterns.

PATTERN: elements repeated in an organized way to create design.
VARIETY: the diversity of art elements and design principles found in a composition.
BALANCE: the arrangement of visual objects to create stability.

REQUIREMENTS:
- 3- 5 Elements of Art are represented in the PATTERNS
- at least 10 different PATTERNS
- the art work as a whole has BALANCE of color and PATTERNS
- there are at least 5 letters present for the ‘name’
- the letters are designed with a specific style
- the style of the lettering, colors, patterns, and design of the work create harmony and work together to successfully convey a specific mood or feeling
- a minimum of 90% of the work must have color, only 10% maximum of white
RESOURCES – click below to go to the links:
Examples of PATTERN on Mrs. Tabitha Eller’s Pinterest board – art:zentangles.
Examples of LETTERING on Mrs. Tabitha Eller’s Pinterest board – letters & numbers.

Step No.1:
ELEMENTS OF ART WITH PATTERN GRID EXERCISE IN SKETCHBOOK

Create a grid in your sketchbook with 4 x 5 (H x W) spaces and choose 4 out of the following:
a. LINE
b. SHAPE
c. TEXTURE
d. FORM
e. SPACE
Student Examples:


Then create PATTERNS with the Elements of Art. You should have 4 different patterns for each Element of Art you chose. Remember: these are sketches for the patterns you are using in your 2-D Design and each pattern is a part of a whole artwork that should represent you. So don’t waste your time with patterns you do not want to use in your work. Craftsmanship should be high quality!
Step No.3:
COMPOSITION THUMBNAILS AND FONTS/LETTERING IN SKETCHBOOK
Create 4 thumbnail sketches of possible designs. Some things to think about as you sketch:
a. Do you want your design to be horizontal or vertical?
b. What are the majority of your patterns? Are they more organic and free-flowing or more geometric and hard-edged?
Student Examples:


Draw 2-3 examples of your name or the 5 characters you are using in your design with different fonts/lettering.
Remember your name/characters cannot be simple line because it will not pop out of your patterns properly.
Again, here is…
Examples of LETTERING on Mrs. Tabitha Eller’s Pinterest board – letters & numbers.
Student Examples:


Step No. 4:
SHADING TECHNIQUE AND SKILL EXERCISE
Follow along with demonstration and complete exercise along with teacher and peers.
TEACHER DEMO SAMPLE:

Step No.5:
COLOR & BLENDING EXERCISE
Choose 3 of the patterns you created on your grid.
Choose a limited color palette for your design. Remember color is key in creating mood and feeling.
Use colored pencil and sharpie to create the 3 patterns with color. Remember to use the techniques and skills you just learned; blend colors together and shade to create depth and interest.
Student Examples:


Step No.6:
TEACHER CHECK-IN & BEGIN FINAL STUDIO PRODUCT
Step No.7:
PEER Critique & Self Critique
RUBRIC: How will I be graded?![]() Step No.8:
Step No.8:
click the link below to go to the STUDY GUIDE activity: