Toys & Treats Still Life
Requirements:
You will need to bring an toy or treat from home to include in your group’s still life. You’ll work with your group to create an interesting composition that includes everyone’s stuff.
Your Still Life MUST include:
-at least 3 glass marbles
-1 object from each person in group (or 2 extra marbles!)
-at least 1 treat (wrapper is optional)
-A clean background
Your group will arrange all of the objects on a piece of white foam core with a white backdrop.
Or…
You could use a game board for a background.
HOMEWORK:
Bring in candy or sweets that are non-perishable AND any toy items that you feel comfortable leaving at school and using for a still life.
Avoid:
Very small things like jewelry
Flat things like keys, calculators, phones, etc.
*Your object must have height, width and depth
Bring in a few things in case the one you like most will not work
**If you forget to bring something, you’ll add 2 extra marbles!
The Process:
1. Bring in candy or sweets that are non-perishable AND any toy items that you feel comfortable leaving at school and using for a still life. Please keep toy items on the small side and make sure the treats will not rot.
2. You will be working with your group to take all the photos that you will use as references. Each of you could choose a different version of your still but everyone must work from the still life that you create.
3. BEFORE you start shooting, each group member needs a job: Photographer, Lighting Director, Props Manager or Editor
4. Then, everyone should get out all the toys & teats and add the 3 (or more) marbles. Decide upon the background (white foam core or game board. *If you include wrappers or packaging, you must include ALL text on the wrapper!
5. The Props Manager should arrange and rearrange all of the objects so that they create an ASYMMETRICAL or an Acute triangle. There should be a variety of heights.You can put long items on their side to make leading horizontals. View the objects through the camera’s view finder and experiment with several different arrangements to create an interesting composition.
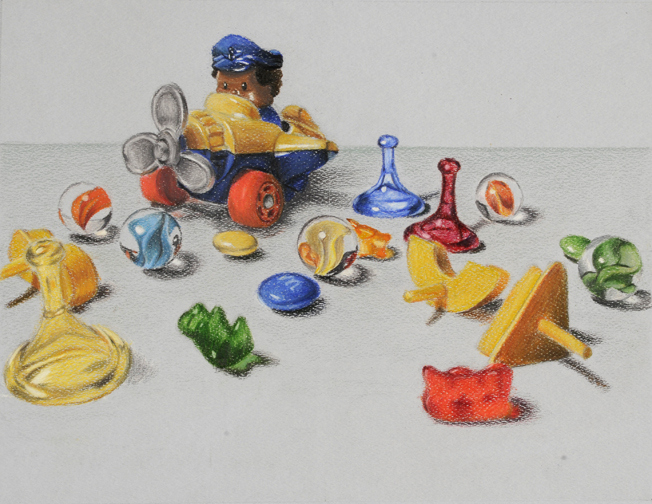
Arrange your object so that it’s ASYMMETRICAL or an Acute triangle with the tallest object slightly off center:

Be sure to also use the RULE OF THIRDS.
– There should be a variety of heights.
-You can use books to make things taller.
– You can put long items on their side to make leading horizontal
6. Photographers: don’t get too close with your camera and cut off too much. Also, you shouldn’t be too far away from so everything is grouped in the middle of your paper. The Editor can crop in tightly on them AFTER you upload your photos!
7. Props Manager: Arrange your objects carefully & AVOID TANGENTS! Tangents are where 2 lines just touch each other in a way that causes spatial ambiguity and a slight jarring on our eyes. It’s not always obvious but tangents can really ruin a perfectly good piece and can unwittingly change the composition in your drawing.
8. RULES FOR TAKING PHOTOS:
- The Props Manager should be the only one to TOUCH the objects.
- Take very close shots (use Macro setting!)
- The Editor uploads, files & chooses the best photos. Print ONLY ONE photo per person!
- You may eat your candy AFTER your photos have printed
9. After uploading & saving in a folder, The Editor will narrow it down to the best 3 photos. Before printing any of them, show them to me to discuss which is most successful.
10.Sketch the objects lightly in pencil on colored pastel or charcoal paper. Check your COMPOSITION…proportions, placement of toys and treats. Use the quadrant grid to help but REMEMBER: your paper should have the same 4 quadrants as your photo! After you are CERTAIN that it’s sketched accurately, add color to the drawing using the prismacolor pencil techniques you practiced.
This assignment is all about capturing the surface quality of your still life objects. Take your time to get the texture of your objects right, particularly shiny candies or transparent gummy bears.
VARSITY OPTION: include glass or plastic containers for the candy or toys.
Drawing Glass:
What follows is an excellent tutorial on how to draw glass is fromDrawCentral.com
Drawing glass objects can be a very technically difficult process. There’s very little room for error when drawing glass, or you can easily ruin the effect. While it may seem like a daunting task, drawing glass objects is one of my favorite things to do. Once you get the technique down, it is incredibly easy, and lends itself to very realistic drawings.

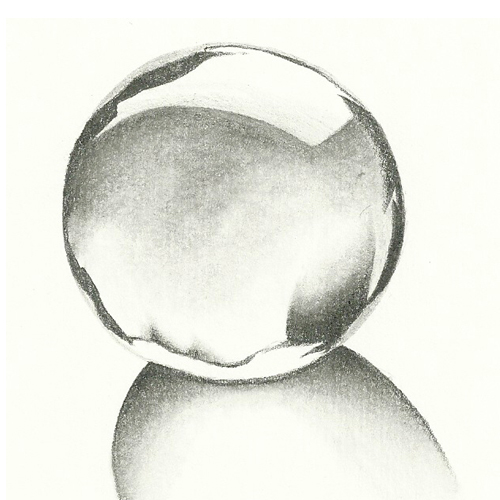
The first step, as with any drawing, is to draw the basic outline of the object. For this tutorial, I have chosen a simple glass ball, so my outline is going to be a plain circle.
 Next, you will need to outline the highlights and reflections of your object. Even though mostglass is clear, it still reflects some light and leaves highlights on its surface. Pay close attention to how light is distorted within the glass, and try to replicate it as close as possible. This step may leave you with a drawing that looks like a confusing bunch of lines, but it will come together in the end.
For example, in this glass ball, I see a large highlight at the top, along with several dark reflections that run along the edge of the ball, with mostly empty space in the middle. Your drawing will obviously differ depending on the object and its surroundings.
 After you have the outlines drawn, you can begin to add shading and volume to your glass object. This process is very similar to the tutorial that I wrote on drawing metal, in that dark shades, next to almost stark white highlights will give you the effect of glass. A trick that helps me often when drawing glass is to start by filling in the darkest areas of the glass that you’ve outlined. This will help to keep you from getting confused and forgetting which areas are dark, and which are highlights.
After you’ve gotten your dark areas filled in, you can fill in the base color of your glass. Though glass is generally colorless, there is usually still a shade that fills in most of the object. For this glass ball, there is a shade of grey that starts darker at the top, and ends completely white at the bottom. If the base color of your glass object is completely white, then you don’t have to worry about this step.
The most important part in this entire process is to try and draw every highlight, shadow, and reflection as close to reality as you can. Draw only what your eye sees. It might not make sense to your eyes at first, but the end result should be very realistic.
*Tip: Keep your lines as clean and solid as possible to replicate the effect of glass.
Try it in Prismacolor pencil!
Below is a great video on how to draw glass marbles in colored pencil:
Here’s a video of marbles done in watercolor:
