
Essential Question(s):
-
What are the Elements of Art?
-
What is non-objective art?
-
What is composition?
-
What are the Principles of Design, balance & contrast?
Mastery Objective(s): The student will…
demonstrate his/her understanding of the Elements of Art & Principles of Design by creating a design that successfully uses non-objective subject matter.
non-objective
- artwork based on the Elements of Art, not on something real.
composition
[kom-puh–zish–uh n]
- the effective selection and arrangement of your subject matter within the picture area.
- RULE of THIRDS

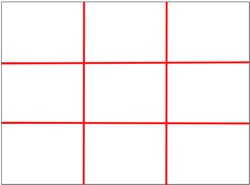
For in-depth information on RULE of THIRDS proceed to this link
balance
[bal–uh ns]
- the equilibrium of various elements within the work of art. Arranging elements to create VISUAL STABILITY so that no one part overpowers, or seems heavier than any other part.
- Symmetrical/Formal Balance- equal balance on each side of an imaginary middle line.
- Asymmetrical/Informal Balance- balance achieved through unequal distribution on each side of and imaginary middle line.
- Radial Balance- occurs when elements in a work are positioned around a center point.


Step No. 1:
4 THUMBNAILS
- Begin by tracing stencil of 4 x 5.5 inches 4 times
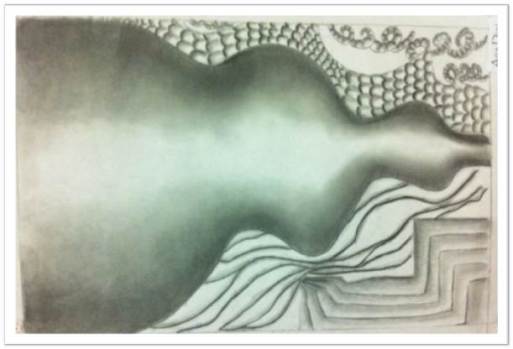
- Create a non-objective line design into each thumbnail. Each sketch must show these items listed in the checklist below.
NON-OBJECTIVE line design CHECKLIST for THUMBNAIL:
- Rule of Thirds: focal point on an intersection
- CONTRAST and VARIETY with
- Value
- Texture
- Size
- Line width and length
- Shapes
- BALANCE
- Does eye move around the whole piece
- Objects are going off the frame of the paper
Step No. 2:
- choose 1 of your 4 thumbnails that have the most successful COMPOSITION with
- BALANCE
- CONTRAST
Step No. 3:
- get FINAL paper
- measure and lightly draw border around paper (1/2 inch) on all 4 sides
Step No. 4:
- lightly sketch out drawing from thumbnail with the same proportions and placement, only larger, on final paper
- when completed with final sketch, begin shading FINAL VERSION with graphite (ebony pencils and HB pencil) and erasers (latex, kneaded and mechanical eraser) – remember your eraser is a drawing tool as well 🙂
Skills & Techniques:
Other than learning composition and placement with the Elements of Art, you need to practice shading techniques. Most Art 1 students start out using a lot of smudging, however, in this Art 1 course, it is going to be important for you to learn and master some of the other techniques as well. Such as hatching, cross-hatching, stippling, random marks and most importantly, blending! Here are some videos to get you started:
Here are some videos about basic drawing tools and techniques like erasing and how to hold a pencil:
Lesson idea from Beth Coast
