Essential Question(s):
-
What is proportion and how does it relate to the human figure?
-
How can you convey movement + emotion in 3-D artwork?
-
What is an armature?
-
How do you build and mold form?
-
What is color theory and how do we use color in everyday life + in art?
Mastery Objective(s): The student will…
-
create a figurative, hanging sculpture focusing on form, texture, color, proportion, balance + movement using wire + mixed media sculpture techniques.

Step No.1: Introduction to the Human Figure, Proportion + Gesture Drawing


Step No.2: Brainstorm
Go onto Pinterest, create a new board titled, art: HANGING FIGURE + research the following topics: (the topics are linked for your convenience)
a. Cirque du Soleil – pin 10-15 images with figures in interesting positions for a hanging sculpture.
b. Figurative Sculpture – pin 10 -15 images with sculptures that show movement + emotion.
BRAINSTORMING + RESEARCH = Figurative Sculpture board with a minimum of 20 pins demonstrating sculptures with proportion, interesting body positions, movement + emotion.
Step No.3: Preliminary Thumbnail Sketches
Draw 4 possible body positions for your hanging sculpture. *Keep in mind your sculpture will be hanging from a foot or hand – it needs to show MOVEMENT!
Label each sketch according to the emotion you are trying demonstrate through the work.
Choose one for your figurative hanging sculpture studio project.
Step No.4: Class Demonstration of Building ARMATURE
a. Straighten + cut 8.5 feet of wire from spool. *Hint: the tiles on the floor are 12 X 12 inches, so measure the wire out to 8.5 floor tiles, snip with the wire cutters + presto!
b. Follow along with teacher demonstration until you get this…

c. Write your name on a small strip of masking tape and attach it to the wire sculpture, so we know which sculpture belongs to who – at this point they are all rather generic looking!

Step No.5: Class Demonstration of Shaping +Adding FORM.

a. Use newspaper + 1/2-3/4 inch masking tape to mold the body onto the wire armature.


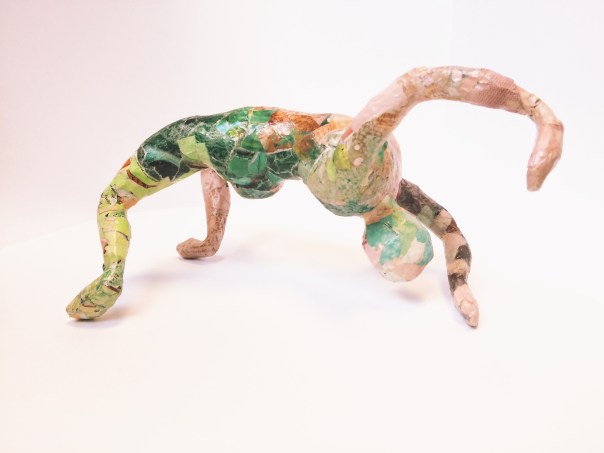
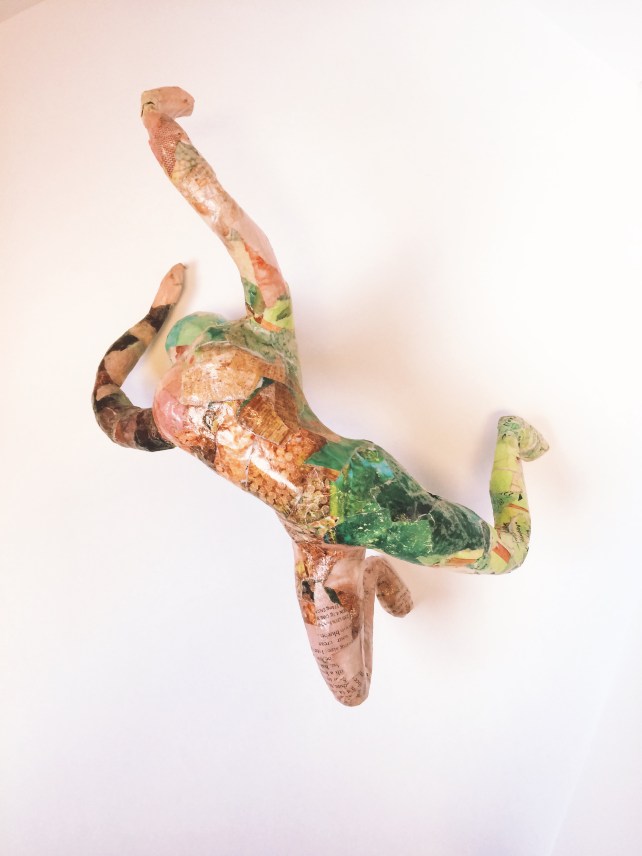
Here is a finished student example of a female form:


REVIEW IF NEEDED: Introduction to Color Theory

a. click on the link to access the Color Theory Prezi to refresh your knowledge of color theory.
Step No.6: Check out these infographics about color to open your mind to possibilities:


Step No.8: Go onto Pinterest, create a new board titled, Color Schemes + research possible color schemes for your sculpture: (the example topics are linked for your convenience)
a. Start with 1-2 colors that you are thinking about using.
Example: I want my sculpture to convey the feeling of excitement, happiness + joy. So I am going to explore some color schemes with YELLOW as a main color. Also, to push the idea of excitement I want to create emphasis + focus. In other words, I want my figurative sculpture to stand out + POP! I learned from color theory that a complementary color scheme is one of the best combinations of colors to accomplish that. The compliment of yellow is purple. On Pinterest I am going to research: yellow and purple color schemes
…find and pin at least 10 different color schemes using yellow and purple.


The first color scheme has more rich + dull versions of yellow + purples with a hint of an orangey-brown color. The third color scheme has more light + dull yellow + purples. Both of these feel more calming versus exciting, so I am going to consider the second or fourth color schemes for my sculpture. Either one expresses all the emotions I am trying to incorporate into my sculpture, but I am drawn to the rich pink color in the second color scheme along with the warmer tones of orange and purple. (If you look at the purples they have more red in them than in the fourth color scheme. It has more blue in the purples creating more cool versions of purples.) To me personally, warm colors express more ‘excitement’, ‘happiness’ + ‘joy’ than cool colors. So I would choose the fourth color scheme for my figurative sculpture.
Another color combination that creates emphasis + focus is a TRIADIC color scheme. The colors that create a triadic color scheme with yellow is red + blue. On Pinterest I am going to research: yellow red and blue color schemes


The first color scheme’s blues are more dull and dark. The yellow in the second color scheme is dull and unsaturated, leaving the last two color schemes to choose from. The third color scheme is brighter and warmer than the fourth color scheme. So I would choose the third color scheme for my figurative sculpture.
Now I need to choose between the complementary and triadic color scheme. There is no right or wrong answer here! Which one do I like more for my sculpture? However, here is another angle to think about…if I have a female figure, I might choose the yellow and purple over the yellow, red + blue. Again, it comes down to personal choice – pick the one you want!
BRAINSTORMING + RESEARCH = Color Scheme board with a minimum of 20 pins and two different main colors/color schemes.
Step No.9: Choose a color scheme that illustrates the emotion you are trying to convey to your viewer.
Step No.10: Gather textures + colors from magazine pages to cover the surface of the figurative sculpture. *Hint: Collect more than you think you will need!
Step No.11: Paper Mache
a. Decide + plan the layout of the colors on the figure.
b. Papier Mache one, thin layer of newspaper that covers the whole body.
c. Tear and/or cut small pieces of the magazine and paper mache them onto the figure.


Step No.12: Attach Wire Loop
a. attach wire loop by poking a small hole into the hand or foot of the wire sculpture. *Hint: Be sure to pay attention to the balance of the sculpture – it may look more pleasing to eye one way or the other.
Step No.13: Seal
a. Using Gloss Mod Podge and a cheap brush, brush on mod podge in thin layers onto the sculpture. Be sure to cover all areas. (Wash the brush very well with soap to get it clean. The mod podge is like glue and the brush will be ruined if it is not washed out properly.)
b. Allow the first layer to dry completely and then brush on another thin layer. It will dry with a hard, glossy finish over the magazine, bringing out the colors and sealing the sculpture to make it last longer.
Step No.14: Attach Twine or Fishing Line
a. If you desire the appearance of a floating figure you can use something ‘invisible’ to the eye, like fishing line. For classroom purposes, I use cheap, bulk twine to the wire loop to hang the sculpture from.
