ESSENTIAL QUESTIONS:
-
What is line?
-
What is line quality?
-
What is blind contour line?
-
What is continuous contour line?
-
What is modified contour line?
-
What are different techniques to use with watercolor?
MASTERY OBJECTIVE(S): The student will…
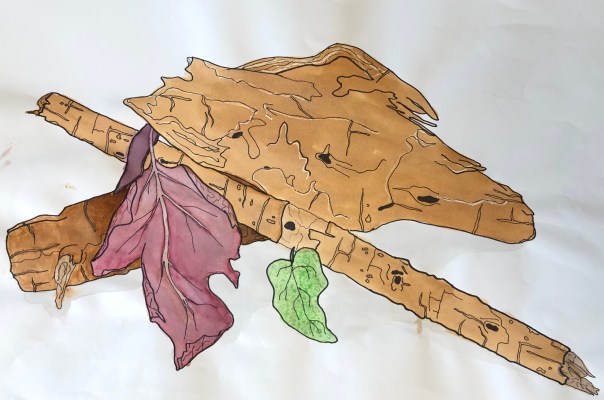
1. demonstrate his/her understanding of line and observational drawing by focusing on the Elements of Art, line and texture to create a modified contour drawing of branches and leaves with permanent pen and ink and watercolor.


Step ONE:
Click on the link below to watch the videos on CONTOUR LINE.
CONTOUR LINE
In class, snippets of these videos will be shown as we go through the in class activity. If you were absent, you will need to go through these videos in your own.
Step TWO:
Warm-Up: 10 minute pre-assessment drawing of ‘branch still life’ on table using LINE ONLY – no shading or value
*Take note of how long you are looking at your object versus your drawing.
Step THREE:
In-class DRAWING ACTIVITY:
CONTINUOUS CONTOUR LINE (1 drawing):
Continuous Contour Line = you cannot pick up your drawing tool! The drawing is completed with ONE line only. You are drawing SLOWLY *Focus on looking at the object at least 80% of the time, compared to looking at your drawing 20% or less.
Using a broad line marker and continuous contour line drawing technique, complete a 8-10 minute drawing of the ‘branch still life’.
BLIND CONTOUR LINE (2-3 drawings):
Create a ‘shield’ to use for the next 2-3 drawings. (a piece of paper with a hole in the middle – the hole should be the diameter of your drawing tool)
Blind Contour Line = you cannot look at your drawing AT ALL or pick up your drawing tool! The drawing is completed with ONE line only. You are drawing VERY, VERY SLOWLY because you want to draw simultaneously with your eye movement! *Focus on matching your eye movement with your hand (hand/eye coordination).
Using a broad line marker, shield, and blind contour line drawing technique, complete a 6-8 minute drawing of the ‘branch still life’.
Turn your paper around and REPEAT with another color marker. The drawings can 8 overlap each other…
- NOTICE how much more you have observed since the first 2 drawings, especially your warm-up; the BLIND contour drawing technique is an excellent way to get your brain switched into the ‘right brain mode’. If you ever find yourself having a hard time with drawing – too tight or stuck looking at a blank, white page then do a few blind contour drawings!
Because this process helps the artist, I am going to have you do another Continuous Contour Line Drawing to show your improvement! I am confident you will improve with this one, so use less time…
CONTINUOUS CONTOUR LINE (1 drawing):
Continuous Contour Line = you cannot pick up your drawing tool! The drawing is completed with ONE line only. You are drawing SLOWLY!
Using a broad line marker and continuous contour line drawing technique, complete a 6-8 minute drawing of the ‘branch still life’. *Focus on looking at the object at least 80 or 90% of the time, compared to looking at your drawing 10-20% or less.
MODIFIED CONTOUR LINE (1 drawing):
Modified Contour Line = you CAN pick up your drawing tool! This is more like typical drawing, however, you are focused on LINE QUALITY and you are still drawing SLOWLY while looking at your object or subject matter 80-90% versus 10-20% at the drawing!
LINE QUALITY means that the line will change throughout the drawing from thin to thick – you are using the LINE QUALITY to pull the viewer’s eye throughout the composition and to make specific parts of the subject matter or object appear to recede or pop forward.
Step FOUR:
Now that you have completed the DRAWING ACTIVITY you can get started on your thumbnails! Using the stencil, so you get the correct proportions, outline 4 insets on a 2 page spread. You should be able to see all 4 compositions at one time.
Draw 4 different compositions with graphite…you need to stay in your assigned seat, but you can move a few feet side to side and zoom-in and out to get the 4 different compositions.
Step FIVE:
Choose the strongest composition and complete a final sketch with Sharpie or Pigma Micron Pens. (I will provide you with a sheet of paper for this task)
Step SIX:
Start your FINAL DRAWING on 15″ x 21″ multi-media paper. You can use graphite to layout the drawing, however, draw lightly because you will need to go over the graphite with pen and ink. Then erase the graphite completely!
Step SEVEN:
WATERCOLOR TECHNIQUE DEMONSTRATION and ACTIVITY
Here are some of the techniques we will cover in class. The artist, Lorraine Watry, created 4 separate videos…
Here is another video covering some beginner basics…
Step EIGHT:
Choose at least 3 of the watercolor techniques to use in your CONTOUR LINE drawing. Practice them on your FINAL SKETCH.
For example – if you have a highly textured area on the branch, maybe it appears ‘crackled’, you can use the salt technique in that area of the drawing.
Step NINE:
After practicing the technique on your FINAL SKETCH, start watercoloring your FINAL DRAWING!
